Remote calendar from private iCloud or any CalDAV source
You can add any calendar that supports CalDAV over HTTPS basic authentication with a few providers already confirmed to work.
Info
Paste the calendar collection URL (usually ending in /events/) when adding CalDAV. The plugin now validates the URL with a PROPFIND request and will reject endpoints that are not calendar collections.
Calendars are automatically re-fetched from their source at most every five minutes. If you would like to revalidate remote calendars directly, you can run the command Full Calendar: Revalidate remote calendars.
Power Up with Categories
CalDAV calendars also support Advanced Categories. You can add a category to your external events (e.g., Personal - Dentist) to color-code them across all your synced devices.
Two-Way Sync and Timezone Behavior
- Two-Way Sync: CalDAV calendars now support full two-way synchronization. Changes made in Obsidian are pushed to the server, and remote changes are pulled in periodically.
- Task Support (VTODO): CalDAV calendars support synchronizing tasks (
VTODOcomponents) in addition to events (VEVENT). Completed tasks are synchronized with their completion timestamps, while pending/active tasks are managed with theNEEDS-ACTIONstatus. Time-based, all-day, and recurring tasks are fully supported. - Timezones: Events and tasks are parsed with their source timezone and converted to your Display Timezone for viewing.
- Cancellations: Cancellations/exceptions present on the server are respected.
CalDAV Task Backlog / Inbox
CalDAV tasks (VTODO components) that do not have a scheduled or due date are parsed as unscheduled backlog items.
- Unified Backlog Sidebar: Open the Task Backlog sidebar (via command palette or ribbon icon) to view unscheduled CalDAV tasks mixed alongside your Obsidian Tasks in a single, aggregated panel.
- Drag-and-Drop Scheduling: You can drag any unscheduled CalDAV task from the sidebar backlog directly onto a date or time slot on the calendar. Full Calendar will automatically schedule it (as an all-day or timed task) and sync the updated dates back to your CalDAV server in real-time.
- Task Creation: Create new unscheduled CalDAV tasks directly in the backlog sidebar by choosing your CalDAV calendar from the creation source dropdown.
- Linked Notes: Clicking the note icon next to a CalDAV task in the backlog will automatically generate and open a local linked markdown note in Obsidian using your configured templates, allowing you to attach rich local notes and details to remote tasks.
The global Linked Note Link Strategy also applies to CalDAV tasks. Name-based mode reuses the exact task-title file across reschedules and recurring occurrences; deadline-based mode keeps dated occurrence notes separate.
Linked Task Date Properties
Linked notes for scheduled CalDAV tasks automatically receive managed date properties:
scheduled: 2026-04-23
scheduled-link: "[[2026-04-23]]"
due: 2026-04-24
due-link: "[[2026-04-24]]"
The scheduled and due values are ISO dates. The corresponding -link values are daily-note links. The outer quotes are YAML syntax and prevent Obsidian from interpreting the wiki-link as a nested list; the property value itself is [[2026-04-23]].
These properties are updated when the task is rescheduled or synchronized from CalDAV. When a task becomes unscheduled, only these managed date properties are removed. Other frontmatter and note content are left unchanged.
Apple Calendar
In order to use your iCloud Calendar, you'll first need to create an app-specific password. Armed with that info and the calendar specific url (given below), you can now add your private Apple Calendars.
Advanced Setup with Specific Calendar URL
You can create a URL string of the format https://p[rn]-caldav.icloud.com/[dsid]/calendars/[pGuid] by using the developer tools (e.g., Safari Dev Tools) on a Mac while logged into your iCloud Calendar web interface to capture the network requests. More info can be found here.
Your URL should look something like this:
https://p37-caldav.icloud.com/8172357017/calendars/2AC2AE2B4-94BE-4DB8-9078-C6907C5E3388
Thanks to @FlyByNite17 (Issue #211) for the iCloud url docs.
Fastmail
In order to set up Fastmail, you'll want to set the calendar dropdown to CalDAV and click the add button to open the setup dialog.
To continue, we'll need to fill out a few fields.
Username
This is just your email address, whether it's an @fastmail.com address or a custom domain. If in doubt, such as if you have a sub account within a Fastmail organisation, you can confirm your address by logging into the web UI and checking the address listed in the top left corner.
Password
As above, you'll want to make an app password to populate your calendar by navigating to Settings -> Passwords & Security -> Third-party apps (Manage) and creating a new password.
Under the Access dropdown, you can create a password restricted to the Calendars (CalDAV) scope.
URL
We need to deviate a bit from the official Fastmail documentation here and reference the specific calendar endpoint for your account.
If your email address used in the Username section is user@example.com, then your URL field will need to look like so:
https://caldav.fastmail.com/dav/principals/user/user@example.com/
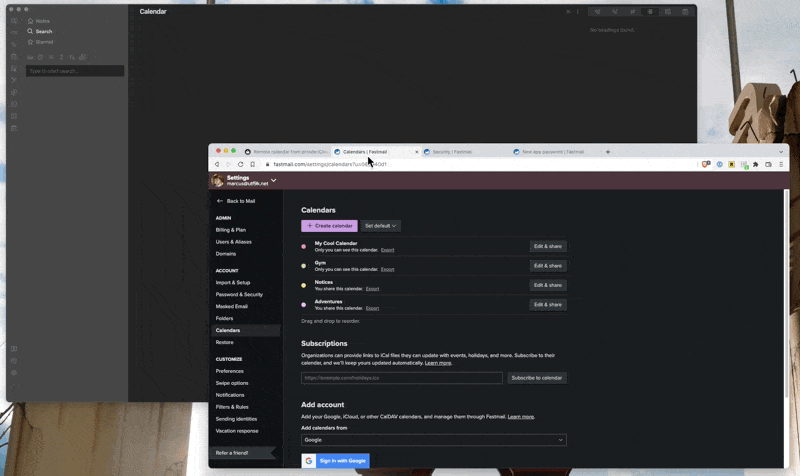
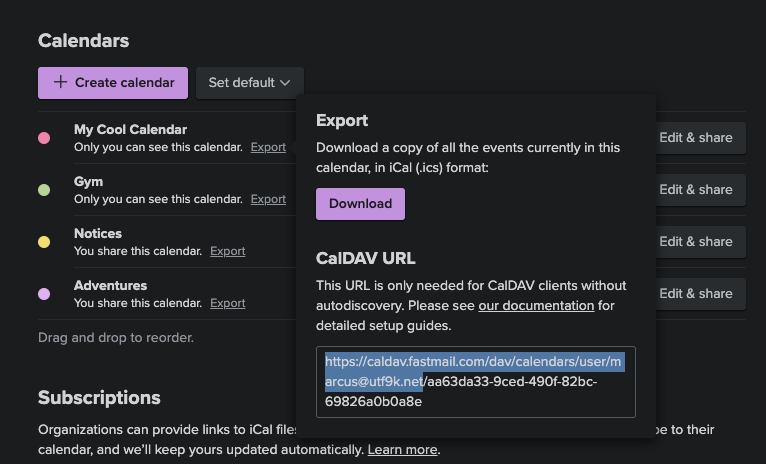
If in doubt, you can find the specific URL by navigating to Settings -> Calendars and then click Export on any of the calendars you have.
Under CalDAV URL, you can copy the URL but make sure you only copy up to the trailing slash after your email address as shown in the codeblock just above.
Flythrough